
Hello everyone, as we all know that Share Extension is appeared from iOS 8, then the capability to share content with other entities, such as social sharing websites or upload services can be done in an easy and convenient way.

We, 9series, an iOS application development company has started doing all the development using Advanced Programming Language Swift.
So today, we are going to build a Shared Extension app in iOS10 with Swift 3.0, an ability to show an icon on the common share-sheet that associates with our main app, which handles the sharing of the content that the user has requested. So the user can easily switch from one app to another, for example, we are sharing a photo from the album with some content that switches our app where we want to upload data to the server.
This is mainly a programming article, so you are required to have Xcode 8 on Mac.
Let’s get started !!!
1. Make a new Xcode Project
First Create a cocoa touch Single View Application in Xcode 8 with some basic UI. Like it is shown below
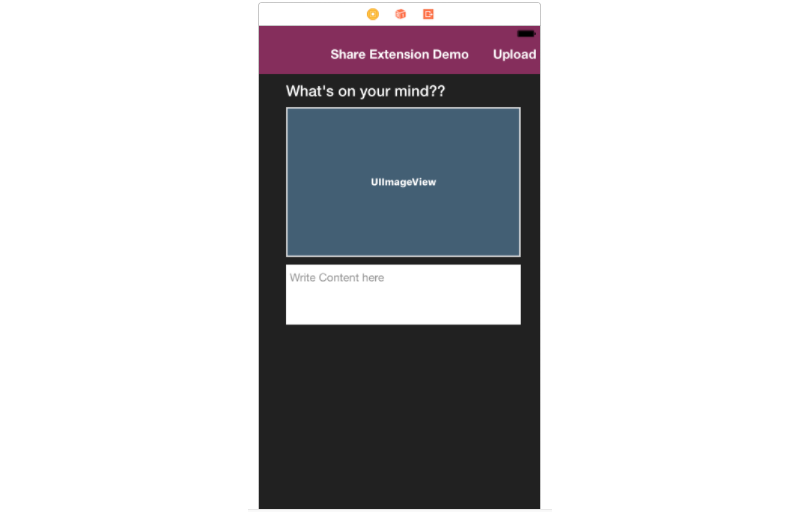
Design the screen with UILabel, UIImageView, UITextView and with UIButton.
When user comes with some sharable content from parent app, we can upload or we can use anywhere in our app.
For Eg, let’s create the Share Extension.
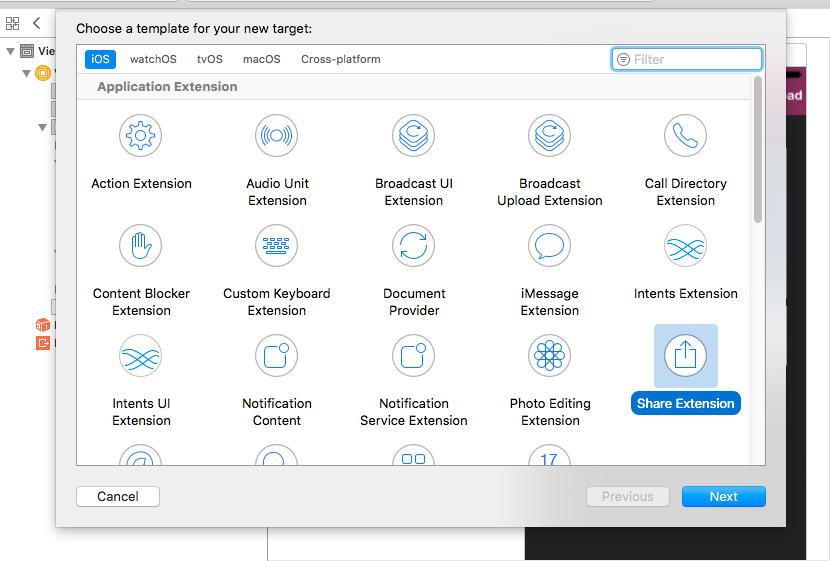
Give some proper name of that extension and it will show you popup view for activating your extension scheme. Choose Activate to use this scheme for building and debugging.
Note: Schemes can be chosen from the toolbar or Product menu.
3. Make an App Group
We want to communicate two app for sharing some content, but Apple doesn’t want a complete free flow of data between the two. Apple recommends a shared NSUserDefaults as a meeting ground where the two app can exchange their data.
Now, we need to make an app group.
Click on your project in the Navigator Pane of Xcode, click on capabilities and your app under the target list turns on App Groups. Give it a name like “group.BUNDLE IDENTIFIER”.
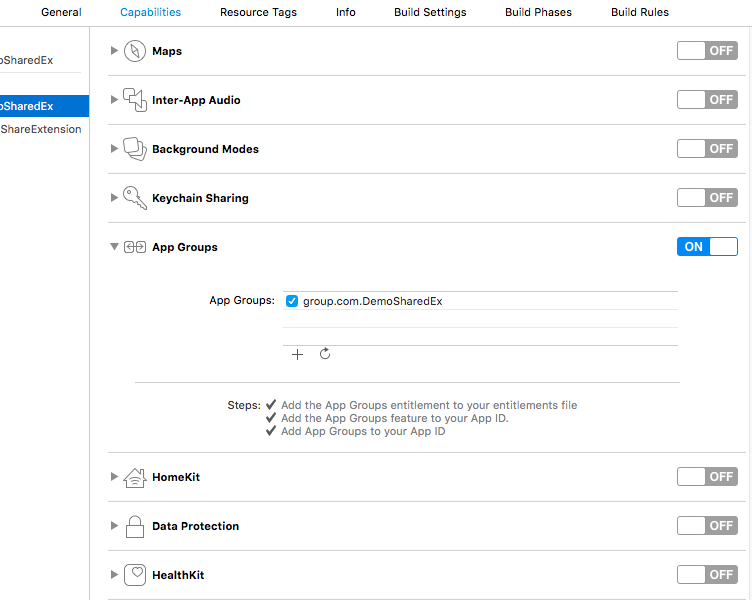
Now click on your extension and do the same.
4. Implementing Share Extensions in Swift
First open your viewController, we won’t go into much detail, because it’s a destination viewController. So we can read content data from User Defaults which is shared by user from Share ViewController.
We have also created an IBAction of Upload button, so that content and photo which is shared by user can be used anywhere in our app.
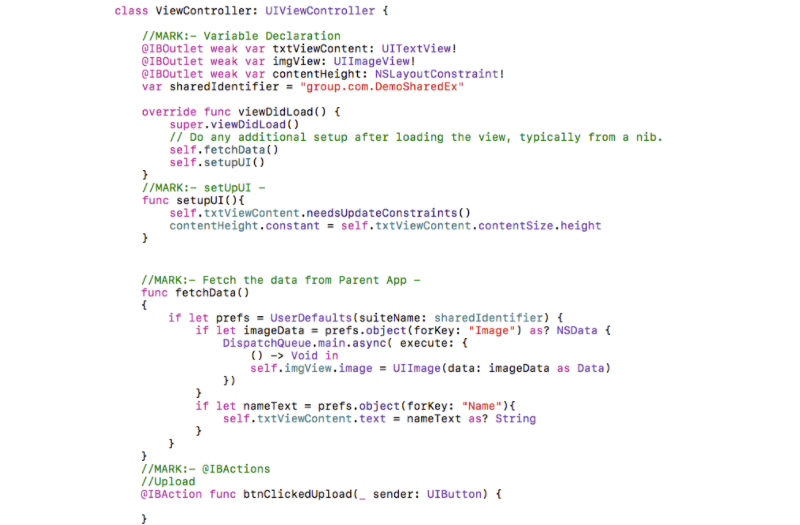
Here, “sharedIdentifier” is the UserDefaults suiteName that we have used for the app group name. An extensionContext where we get a list of NSExtensionItems. This is a fixed array of data sent to our extension from a parent app. We are getting photo and content from our photos app that are already set to our main app.
Let’s look at the “ShareViewController” from our Shared Extension Folder which is subclass of SLComposeServiceViewController. SLComposeServiceViewController has some methods and properties associated with the lifecycle of a share-sheet composition view.
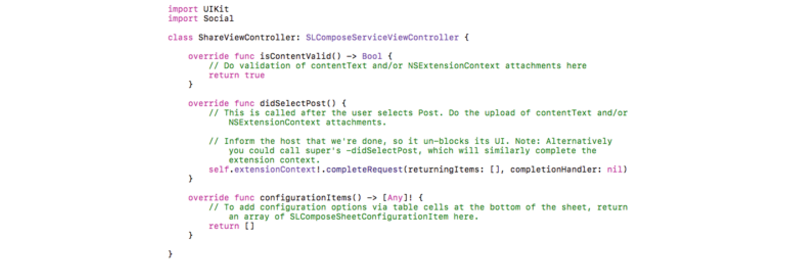
isContentValid() :- It is called every time when the content in the compose view changes. Here, we can check the input data is valid or not. It is called first, and will disable the post button when it evaluates to false.
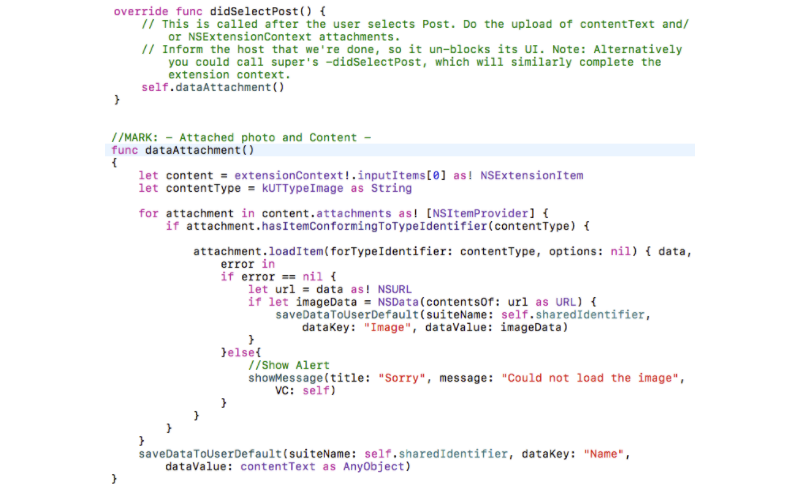
didSelectPost() :- As the name suggests, it is called when the user presses the post button. Here we can do something with the user input. Once the upload is scheduled, you must call completeRequestReturningItems([], completionHandler:) so that the host app can un-block its UI. When the upload request is done, it calls the completion handler that was passed into the previous mentioned function call.
configurationItems() :- Here, we can add more things for the user to select when they are sharing. In our case we are sharing a photo with contentText. You can also make it more dynamic with some other controls.
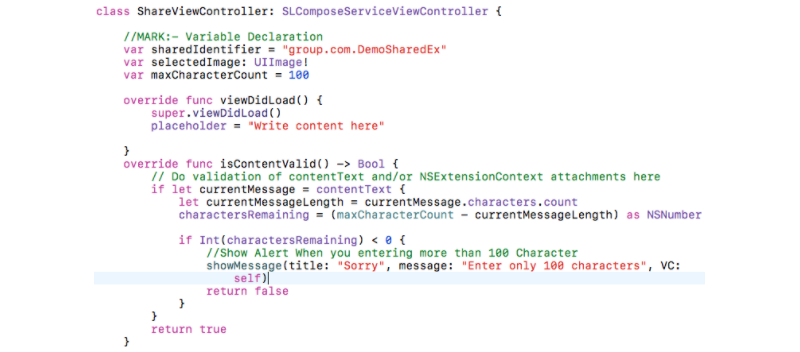
contentText :- A string which represents what the user has typed into the composer.
charactersRemaining :- Is a number which appears on the compose sheet. When negative number shows, its appearance becomes red.
Here is the code of “ShareViewController”
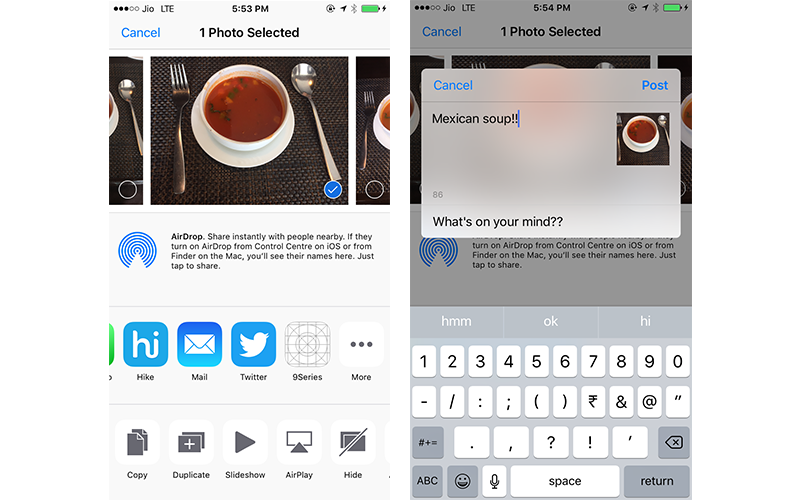
Here, we are selecting one image from photo album and then clicking on share button, it will open share sheet with our Share Extension app Icon.
Select that app and it will open composition view.
We have mentioned maximum characters of contentText as 100, so if you enter more than 100 characters, than it will generate alert message and post button will be disabled. You can also check number of characters at the end of compose sheet.
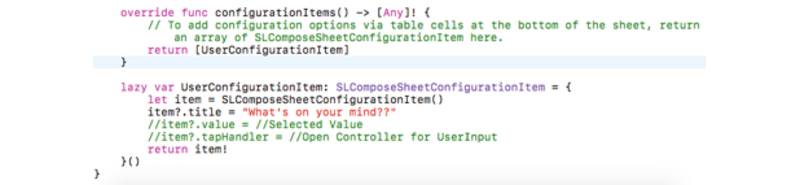
Configuration! items is where we can add more things for the user selection, when they are sharing. Like, Open UITableViewController as subview Controller and selecting User Input it will display as item value at the bottom of compose sheet.
Configuration! items has title, value, and a tapHandler. So you can add extra functionality for selection from User.
ExtensionContext has list of attachment as NSExtensionItem. We’ll loop through the attachments, and look for one typed as an image. It will have the type identifier kUTTypeImage. NSItemProvider items are lazily loaded images, videos, URLs and so on. We’ll load it using “loadItemForTypeIdentifier”. This has a completion handler, where we’ll read the image from the URL, and then we’ll save it to defaults.
After pressing Post Button, It will save Image in UserDefaults with “Image” key, and contentText with “Name” key.
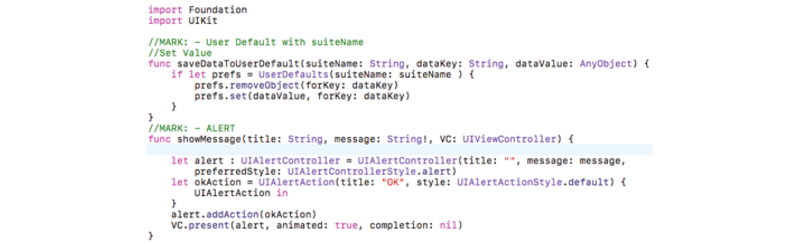
We have created two utility methods for saving data to user defaults and for alert message.
Till now, Apple wouldn’t accept this in their app store. We need to tell iOS when to show our share extension, and what can be selected. Otherwise when we compile we’ll get a warning.
“Warning: Embedded binary’s NSExtensionActivationRule is TRUE PREDICATE”
So for that, open the “info.plist” as source code by right clicking on it. We’re going to change the NSExtensionAttributes section. This means our extension is activated only for images, and only when it’s a single image. If you select more than one image, the extension app automatically hides from share-sheet.
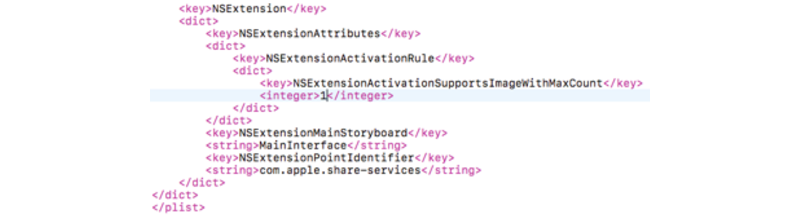
You can change your display name of your app in share sheet by replacing the code in the “info.plist” of your Extension.
5. Test Your Share Extension
1. First you have to simply run your app.
2. Then run your Share Extension.
3. When suggested to choose an app to run, choose Photos.
4. Once the extension starts running, select a photo and tap on the Share button.
5. On the first run, you will need to add your extension to the share sheet.
6. Click on the More button to the right of the other share icons and turn on the switch for your extension & then select Done.
7. Now you will be able to see your extension icon in share – sheet.
8. Select an individual photo and click on share. By selecting your app, add some content and press post button.
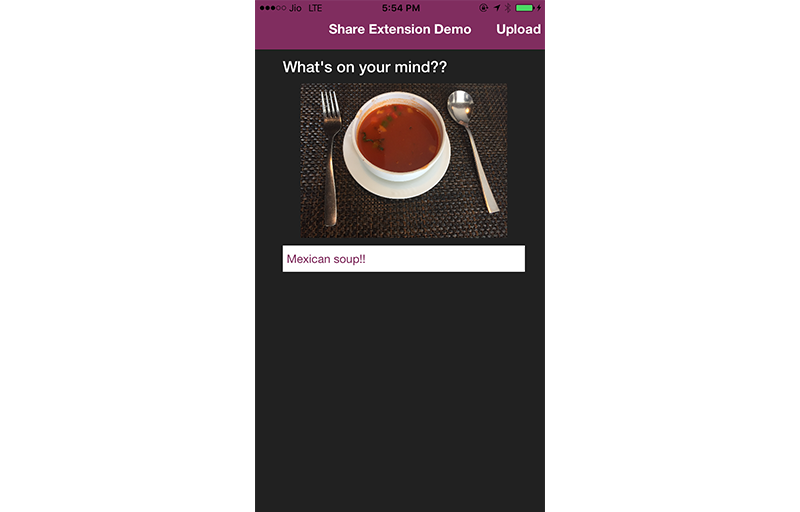
The image will be saved to your main app. To confirm this, redirect to your app. You can check the content you entered in the textview and the image above the content.
In this article, our best iOS application developers in USA, have only covered some basic UI. You can also make it more dynamic with other controls.
Hopefully, all of this will help you share data with your parent app.

Happy Coding! and feel free to share your own experience on “[email protected]”.
Apple’s WWDC (World Wide Developer’s Conference) was held on June 13-17. Each year, over 5,000 iOS developers from around the world gather to learn more about the new releases in iOS, OS X, watchOS, and tvOS.

Earlier this week, Apple officially kicked off their annual WWDC event in San Francisco. WWDC was like Christmas for Apple developers.
As always, the event began with a keynote during which Apple announced updates for their iOS, OS X, watchOS, and tvOS platforms.
Although we haven’t had time to go through all the docs and samples yet, but we thought it might be useful to post some of our experience of new releases:
iOS 10
Big. Bold. Beautiful
Everything you love is now even better with iOS 10.
1. SiriKit
Now there is the ability to integrate with Siri.
SiriKit defines six distinct domains that an app can use to make services available to Siri:
If an app falls into one of the above listed domains, we should provide an Intents Extension point within an app. Siri deals with all of the nuances of language processing and semantic analysis, and translates the user’s request into an actionable item that we handle in our Intents Extension.
Want to dig more: Introduction to SiriKit
2. iMessage Apps
In the keynote, Apple demonstrated a ton of cool new features like link/media unfurling, reactions, message bubble effects. With the new Message framework, it creates extensions that let users send text, stickers, media, files and most intriguing: interactive messages.
Sticker Packs
The simplest type of extension is sticker packs.
Interactive Experiences
The APIs allow to create an entire experience right within the Messages app, even provide a custom user interface!
Want to dig more: API Reference
3. User Notifications
A new User Notifications UI framework has been introduced that allows developers to create rich notifications which was never possible before.
For example, notifications can now have embedded media much like the stock Messages app.
Note:
This is achieved through a new extension that is invoked when a notification is received and looks to be extremely powerful.
Want to dig more: User Notification
4. Security
Apple’s war for encryption continued at the 2016 WWDC event in San Francisco. Apple announced that it will require all iOS apps to use HTTPS connections by January 1, 2017. Apple will require all apps to enforce ATS, which will force the connections to HTTPS instead of HTTP.
Note:
HTTPS is simply the secure version of HTTP (Hypertext Transfer Protocol), the protocol for data communication online.
1. Apple will require all iOS apps using HTTPS connections before 2017, increasing security and privacy for mobile users.
2. The requirement comes through an enabling of ATS (App Transport Security), an iOS 9 feature that is currently not mandatory.
3. Apple is forcing the use of ATS/HTTPS marks a definitive shift in the company’s battle for encryption, and could win an audience with the privacy-conscious
Swift 3
Swifty
The important announcement of this year’s WWDC keynote was, without a doubt, the introduction of Swift 3.
The change from this year will have the biggest impact on developers due to the release of Swift 3 in late 2016, since it will require us to all make some major changes to our Swift code.
Swift 3 is conveniently packaged with Xcode 8, side-by-side with Swift 2.3. One of the biggest changes coming with Swift 3 is that, Swift 3 version is much more concise, and makes use of an enum to make it more “swifty”.
Lets check an example of working with strings:
// Swift 2.2
let content = txtDescription.text.stringByTrimmingCharactersInSet (NSCharacterSet.whitespaceAndNewlineCharacterSet())
// Swift 3
let content = txtDescription.text.trimming(.whitespace And Newlines)
The goal is to reduce verbosity in naming to make expressive code. In the long run it will make the language cleaner and more approachable for new developers.
Swift Playgrounds
Learn serious code on your iPad. In a seriously fun way.
Want to dig more: Swift API Design Guidelines,Github Swift Evolution
Xcode 8
It wouldn’t be WWDC without an update to Xcode!
Compare to last year, we were unable to use Xcode 7 unless migrates our source code to Swift 2. Xcode 8 provides a migration tool to convert existing code to Swift 3, which makes things much easier. It combines both Swift 2.3 (Source compatible with Swift 2.2) and Swift 3.
Feature of Xcode 8
1. Memory Debugger: This is a built-in tool that lets view the entire memory object graph of running application, so you can quickly isolate leaks and circular references. Even more, the new memory debugger can automatically detect memory leaks and help to quickly diagnose the problem.
2. Interface Builder Improvement: Have you ever tried zooming out in Interface Builder, then tried to drag in a button, and realized that you couldn’t unless you were at 100% zoom level? Interface Builder in Xcode 8 now allows to edit scenes at any zoom level.
3. Source Code Editing: Create own Source Code Editor Extensions to customize the coding experience. There is a new Xcode template to get started with, and when you’re finished, can distribute extensions via the Mac App Store or as a Developer ID signed binary through any other medium.
4. Performance Improvement:Apple claims that Xcode 8 is radically faster in several categories – for example Indexing Tests can be up to 50 times faster.
MacOS Sierra
What can your Mac do now? Just ask.
Goodbye, OS X. Hello, MacOS. After 15 years, OS X has been renamed to MacOS to better align with the other three platform names. The latest version of MacOS is MacOS Sierra.
MacOS Sierra helps to rediscover best photos, shop more securely online, and work more seamlessly between devices.
1. Siri
Siri makes its debut on Mac, with new capabilities designed just for the desktop. The handy features of Siri on iOS are now on Mac, along with brand-new ways to help with the things you do every day on your desktop.
2. Apple Pay for the Web
The web, now accepting the easiest and safest way to pay. This is huge for any developers working on a website with eCommerce.
Want to dig more: Apple Pay js
3. Apple File System (APFS)
Apple has announced an entirely new file system!
The current file system used by default, is HFS+ which was released in 1998 when floppy disks were still a thing. Today, most – I am looking at you base model iMac with your 5400RPM HDD – new systems include fast Flash based SSDs. The Apple File System was designed with Flash/SSD in mind and built with native encryption.
Cloning provides the ability to create instant “copies” of files and directories that cost nothing in disk space. Due to the copy-on-write behavior the cloned files and directories are not actually copied unless modifications are made. The snapshotting ability allows the system to create a read-only instance of the data so that it can be efficiently restored to a given point in time.
4. Photos
Rediscover memories in beautiful new ways.
5. Universal Clipboard
Copy on one device. Paste on another.
6. iCloud Drive
Your Desktop and Documents folder. Accessible on all your devices.
7. Optimized Storage
When you need more space, let your Mac find it for you.
watchOS 3
Feels like a whole new watch.
It’s a common opinion that the Apple Watch platform has been a bit of a flop with regard to app development. It has been missing something since the beginning: speed. Launching apps on the watch is simply painful. In this keynote, the main focus was making apps launch instantly.
1. Speed Enhancement
The big things behind the speed enhancements of the watch is the introduction of Snapshots, the Dock, and Background Tasks. The three of these combined allow watch apps to stay up to date and available to the user at a moment’s notice.
2. SceneKit and SpriteKit Availability
You can now utilize both SceneKit and SpriteKit in the watch apps. At first mention it looks like just for games, but Apple explained another use case: creating nice custom animations for regular apps as well. The current limitations of UIKit on the watch prevent developers from creating custom animations. But with watchOS 3, you can add live 3D rendered content to an apps using .scn files bundled with resources, or can opt to create interactive 2D animations with bundled .sks files.
Business travelers in emergencies will be able use the SOS feature to connect to 911 and get notifications and GPS coordinates sent to their emergency contacts. It works in different countries as well, so you don’t have to remember different emergency numbers.
tvOS
The updates to the tvOS SDK seem pretty light.
Single Sign-On
There is a new concept of single sign-on for TV providers so that users can authenticate with their provider once and be logged in to all supported video channel apps. So if developing an apps need this level of authentication, please check out the Video Subscriber Account framework!
Below are more frameworks available to developers:
Conclusion
It’s never been a better time to be or become a iOS developer. We haven’t had a chance to look through everything yet, so feel free to post any of your own thoughts, or anything we may have missed!
In the meantime, we’ll be working on making a demo about the new release. Stay tuned!
Want to share something innovative about the new release? Feel free to write us at [email protected].
Thanks for your time reading this article.